Program Control and Routines
Subroutines key use is organizing code. Until now you have put all of your code in LAD 3 which is the default routine. But as your programs get longer, it will become imperative that you come up with a method to organize them. They also have many other uses which you will learn later in this lesson.
1. Create a new program with the proper I/O configuration for your PLC setup.
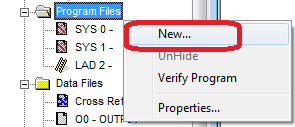
2. Right-click the Program Files folder in the left pane and select New.
3. Name it "CONTROL". There is no particular reason to name it CONTROL, the point is to name it something that relates to the function of the code in it.
4. Create another routine, number 4 called "OUTPUTS". Your Program Files folder should now look like the following.
5. Find the Program Control tab of your instruction set and put a JSR in LAD 2.
6. In the address of the JSR type U:3 which will assign it to subroutine 3, LAD 3 - CONTROL.
7. Add another JSR to LAD 2 addressing U:4 for the LAD 4 - OUTPUTS.
8. Open up the LAD 3 - CONTROL subroutine. Add an XIC B3:0/0 and an OTE B3:0/1 as shown below. You can label them Internal Button and Internal Output as shown below.
9. Open up LAD 4 - OUTPUTS subroutine. Add an XIC B3:0/1 and an OTE O:0/0 as shown below. B3:0/1 will already be labeled from step 8, you can label O:0/0 Green Light.
10. Download this program, switch the PLC to Run Mode, and Go Online.
11. Double click on LAD 2 in the Program Files of the Left Pane to view it.
12. Right click on LAD 3 CONTROL and select New Window to open it separately.
13. Right click on LAD 4 OUTPUTS and select New Window to open it separately.
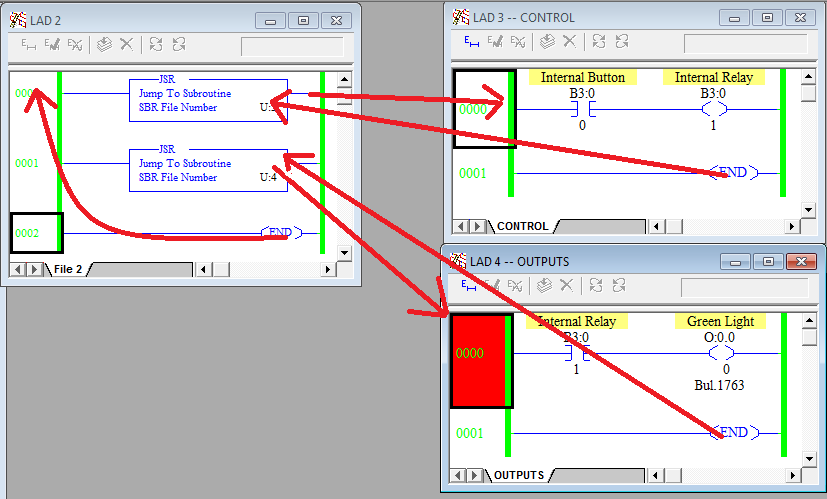
14. Arrange all the windows in order from LAD 2 to LAD 4 so you can see all of them at once, such as below. From here we can see that the JSR in Rung 0 of LAD 2 executes LAD 3 from Rung 0 to the END instruction then it returns to the same JSR, then continues to Rung 1. The JSR in Rung 1 of LAD 2 executes LAD 4 from Rung 0 to the END instruction then it returns to the same JSR, then continues to Rung 2 when it sees the END instruction and goes back to Rung 0 of LAD 2 and repeats. Remember that all of this happens in a matter of milliseconds.
Note that when using the JSR as done above the RET return instruction is not necessary. I've had a few people say that you should have a RET "just in case". If you look in the RsLogix 500 help file, it states "Without a RET instruction, the END statement (always present in the subroutine) automatically returns program execution to the JSR instruction in your calling ladder program.". Therefore, the RET is unnecessary and can only add confusion in how the program is scanned.
JMP Jump and LBL Label - These two instructions allow you to skip over rungs. A JMP instruction will skip the execution of rungs until it encounters its associated LBL label. Multiple JMP Jumps can use the same LBL Label.
SBR Subroutine and RET Return - The SBR Subroutine instruction serves no purpose and is always evaluated as true. The RET Return instruction will immediately return to the JSR instruction that called it without finishing executing the code in its subroutine.
Note that you can nest up to 8 subroutines with the Micrologix PLC unless you are using the STI subroutine, DII subroutine, I/O event-driven interrupt subroutine, or user fault routine, then you can only nest 3 subroutines.
MCR Master Control Reset - All non-retentive outputs in the MCR zone will be turned off.
TND Temporary End - Acts just like the END instruction at the bottom of the routine but can be placed higher up, conditionally suspending the execution of the code after the TND.
SUS Suspend - This instruction causes the PLC to enter Suspend mode and stores the ID in S:7. All outputs are de-energized. It is intended to help capture specific events when troubleshooting and debugging.
IIM Immediate Input with Mask - This instruction interrupts the execution of the program and updates the inputs, then resumes the program execution.
IOM Immediate Output with Mask - This instruction interrupts the execution of the program and updates the outputs, then resumes the program execution.
REF I/O Refresh - This instruction interrupts the execution of the program, write outputs, service comms, read inputs, then resumes the execution of the program.